You are here: Building the Model: General Elements > Processing > Routing Edit Table
The Routing edit table defines the outputs for each process record defined in the Process edit table. The Routing edit table is really just a sub-table to the Process edit table (i.e., all routings that appear in the routing edit table apply to the currently highlighted process), though the two tables appear side by side. Not all process records need to have a corresponding routing. If the routing is omitted, ProModel will search forward in the Process edit table for another process for that entity at that location. So an entity's complete processing at a location could be broken into several records. In that case, only the last process would have a routing. If no routing is defined for at least one of the process records for a given entity and location, an error occurs.
Another situation that does not require routing is when an entity changes its name at a location after a RENAME AS or SPLIT AS statement. Any time during processing logic that an entity changes its name, ProModel searches forward in the Processing edit table until it finds a process for the new name at the same location. For example, if the identity of an entity is changed through a RENAME AS statement in the operation logic, then no routing block will apply to the old entity. Instead, the newly named entity will be routed by the process for the new name. (See Rename).
The fields of the Routing edit table are as follows:
Blk This field contains the block number for the current routing block. A routing block consists of one or more alternative routings from which one is selected based on the block rule (e.g., a list of routings where one is selected based on the most available capacity). Since all of the routings using the same rule are part of the same block, only the first line of each routing block contains a route block number. If no routing blocks have been referenced explicitly in the operation logic (for example "Route n"), all routing blocks will be executed in sequence upon completion of the operation logic (See Route). Multiple routing blocks are processed sequentially with the next block being processed when all of the entities in the previous block have begun executing any move logic defined. To change the routing block number or add a new routing block, see the discussion on the Routing Rule dialog box later in this section.
The following example shows a process record with two separate routing blocks. Note that both routings will execute upon completion of the operation time because no ROUTE statement has been specified. One EntB gets routed to Loc2 and one EntC gets routed to Loc3.
Process Table
|
Entity |
Location |
Operation (min) |
|---|---|---|
|
EntA |
Loc1 |
WAIT N(5,.3) |
Routing Table
|
Blk |
Output |
Destination |
Rule |
Move Logic |
|---|---|---|---|---|
|
1 2 |
EntB EntC |
Loc2 Loc3 |
FIRST 1 FIRST 1 |
MOVE FOR 1 MOVE FOR 2 |
Output If a routing is defined, the name of the entity resulting from the operation must be entered here. This name may be the same as the entity that entered, or it may be another name, or even several names, each on a different line.
Using another name works much like a RENAME-AS statement, except that the entity is routed according to the routing block instead of being processed further at the same location. Using several names on different lines is similar to having a SPLIT AS statement in conjunction with a RENAME-AS statement. The difference is that multiple routing blocks are processed sequentially while split entities get processed concurrently.
If the reserved word ALL was used as the incoming entity type for this process, it may also be entered here. Otherwise, every entity entering the location will change to the specified output entity. (See the discussion on using ALL in the Entities section.)
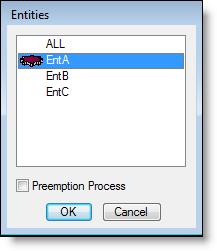
The entity list box defaults to the current field entity, the last entity selected, or the first entity defined.
To better anticipate the entity entry likely to be made, the entity highlighted in the list box defaults first to the current field entity, then to the last entity selected, and finally to the first entity defined.
The example below shows how an incoming entity, EntA, changes identity and becomes an EntB upon exiting location Loc1. This is done by simply specifying the new entity name as the output entity.
Process Table
|
Entity |
Location |
Operation (min) |
|---|---|---|
|
EntA |
Loc1 |
WAIT T(2,5,8) |
Routing Table
|
Blk |
Output |
Destination |
Rule |
Move Logic |
|---|---|---|---|---|
|
1 |
EntB |
Loc2 |
FIRST |
MOVE FOR 1 |
Destination This is the location to which entities are to move after the operation is complete. Optionally, the destination may be followed by a comma and a routing priority. If no priority is specified, the default is zero.
The location name may be typed directly in the field, or selected by either clicking in the field and then on the heading button, or double clicking in the field. The resulting dialog box looks like this:
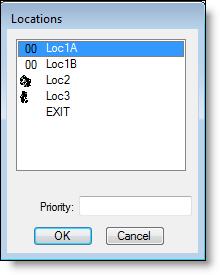
Instead of entering a location name, you may use the LOC() function which returns the location name corresponding to the index designated by an expression. For example, LOC(5) routes to the fifth location defined or the fifth record in the location edit table. You can also specify variable destinations such as LOC(Att4). However, the LOC() function may not be used in conjunction with the BY TURN, UNTIL FULL, CONTINUE, and IF EMPTY routings. (See Loc() for more information.)
Rule This field defines the rule for selecting the route destination. An output quantity may also be specified as part of the rule. This quantity works much like the SPLIT AS statement. (See the following discussion on the Routing Rule dialog box.) To open the Routing Rule Dialog box, double click in the field or click in the field and then on the heading button.
Move Logic The Move Logic window allows you to define the method of movement as well as any other logic to be executed between the time the next location is claimed for routing to the time the entity arrives, but not yet enters, the next location. To open the Move Logic window, double click in the field or click the heading button. This window allows you to manually edit the logic or click on the Build button to use the Logic Builder. It also provides other convenient buttons for editing and printing the move logic. For single move statements it is easiest to right click in the move field to open the Logic Builder. If left blank, it is assumed that no time, resources, or path networks are needed to make the move. (See Routing Move Logic.)